In a previous blog post I mentioned using MetalLB to ingress non-HTTP protocols. As noted on MetalLB’s website kubernetes by default does not offer a load balancer. With that in mind this blog post should to help you setup MetalLB to act as a load balancer to ingress non HTTP protocols.
Table of Contents
- Prerequisites
- Does it work on my k8s
- Knowledge
- Tools Needed for Testing
- Configuration
- Installing MetalLB
- Configuring MetalLB
- L2 Advertisement
- IP Address Pools
- K8s Service
Does it Work on My K8s
Before getting started I suggest you read this page to ensure the compatibility of MetalLB running on your kubernetes cluster. This is quite important as MetalLB is designed to run on bare-metal kubernetes clusters.
Knowledge
It is assumed in this article you have working knowledge of kubernetes, kubernetes networking, and L2/L3 networking. If you find that you need more information on some of these topics please feel free to contact me.
Networking
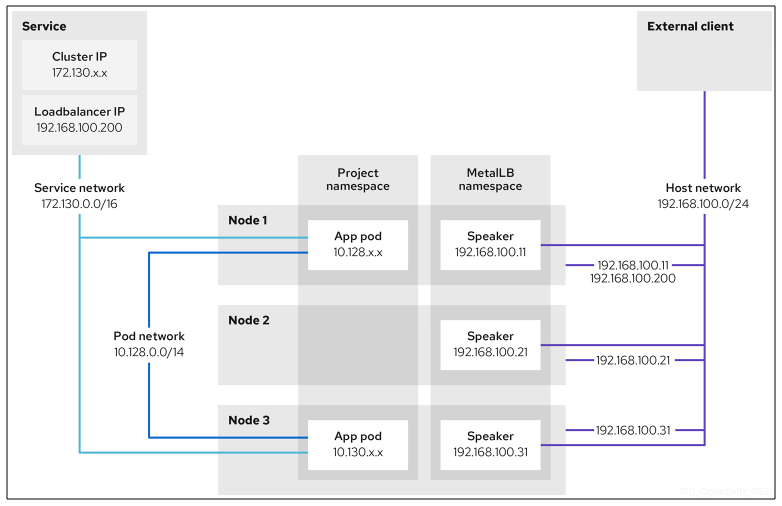
Before we start installing and configuring metallb we need to consider a few networking items. First off metallb has two modes you can deploy it in, L2 and BGP. We are going to focus on L2 in this post. This mean we are going to need some free IPs on the same subnet as the k8s worker nodes (as depicted in the diagram below that would be the host network). The way in which metallb works is that its speaker pods running on the nodes gratuitously ARP for ACTIVE IP addresses that are assigned to services.
Tools Needed for Testing
It is also extremely important to note that ping will not work for testing metallb. This because the speaker pods only ARP and thus pings fail. To properly test successful network connectivity you will need arping installed.
The headache with arping testing is that you will need to have your testing host on the same subnet as your k8s nodes.
Installing MetalLB
It is recommended to follow the instructions on MetalLB’s own site. In my environment I am running OpenShift and simply installed the operator.
Configuring MetalLB System
Once you have metallb installed we need to spin up the metallb system on your cluster. Do so you will need to create a simple yaml as seen below. If you ever find yourself needing to debug your metallb pods and need more detailed log info add the lines in yellow (this will of course cause a respawn of your metallb pods).
apiVersion: metallb.io/v1beta1
kind: MetalLB
metadata:
  name: metallb
  namespace: metallb-system
spec:
  logLevel: debug
L2 Advertisement
Layer 2 mode does not require the IPs to be bound to the network interfaces of your worker nodes. It works by responding to ARP requests on your local network directly, to give the machine’s MAC address to clients. To enable the L2 we will create a yaml as seen below. You will note that we need to specify an ipAddressPools section before we have defined it, so whatever you define here you will need to use for the name of it. Also its possible to use multiple address pools.
apiVersion: metallb.io/v1beta1
kind: L2Advertisement
metadata:
  name: l2-adv
  namespace: metallb-system
spec:
  ipAddressPools:
    - ip-addresspool-1
    - ip-addresspool-2
IP Address Pools
To setup your address pools follow the below yamls. Two things of interest,1) you can use ranges and/or subnets, 2) you can disable autoassign which make it nice to select the IP you want if you haven’t automated and integrated your external DNS into your k8s yet.
apiVersion: metallb.io/v1beta1
kind: IPAddressPool
metadata:
  name: ip-addresspool-1
  namespace: metallb-system
spec:
  addresses:
    - 192.168.100.101-192.168.100.127
  autoAssign: false
---
apiVersion: metallb.io/v1beta1
kind: IPAddressPool
metadata:
  name: ip-addresspool-2
  namespace: metallb-system
spec:
  addresses:
    - 192.168.100.128/27
  autoAssign: false
K8s Service
As we saw in the previous blog post about setting up an SMTP relay the service included a line that specified “type: loadBalancer”. This line in the configuration is key to using the metallb service. Since in the address pool configurations we opted to not auto assign IP addresses we have the other highlighted line below setting the IP address that the speaker pod will
apiVersion: v1
metadata:
  name: smtp-relay
  namespace: media
  labels:
    app: smtp-relay
spec:
  loadBalancerIP: 192.168.100.102
  ipFamilies:
    - IPv4
  ports:
    - name: smtp
      protocol: TCP
      port: 2525
      targetPort: 2525
  type: LoadBalancer
  selector:
    app: smtp-relay

Leave a comment